We provide you with the 5 key points to successfully install it yourself. Also find our Feelnets toolbox below.
When you want to install a custom-made net, it can sometimes seem difficult to start alone. It’s true that even an experienced DIYer can feel helpless when faced with the task. Indeed, installing a net is not part of everyday DIY work and can seem quite technical: fixings, knots, lacing, tensions… Even experienced sailors know that installing a catamaran trampoline, which inspired contemporary designers with the idea of the home net, requires a good deal of elbow grease. This is to obtain the right tension to guarantee comfort and safety. The home net is not like a giant hammock and its installation involves different key points that must be absolutely respected. This is why at Feelnets, the experts in custom nets, we do everything to simplify the installation of your net. We provide guides and are available at every stage of your project to give you all our expert advice.
Whether it’s a home net or an outdoor net, such as a net for a playground or a safety net for a swimming pool, it is entirely possible to install it yourself. A figure to reassure you, if you want to try: 96% of our customers install their net by themselves without encountering major difficulties.
If you’re still hesitating, this customer testimonial might convince you:
Testimonial from Guillaume T.
« Au début, je me suis posé la question, je n'étais pas sûr de pouvoir l'installer moi-même le filet pour mezzanine dans mon habitation. Cependant, grâce au guide d'installation Feelnets fourni avec mon colis et aux vidéos très instructives disponibles sur le site Feelnets, tout s'est très bien passé.

Avec de la méthode et le guide d'installation Feelnets, clair et détaillé, cela m'a semblé très simple. Chaque étape est accompagnée de schémas et d'instructions faciles à suivre.

Les vidéos sur le site web de Feelnets m'ont été très utiles elles aussi. Elles m'ont permis de visualiser chaque étape en action, ce qui est assez rassurant.

J'ai été agréablement surpris de constater que je n'avais pas besoin d'outils spéciaux ni de compétences particulières. Les fixations étaient fournies avec mon colis, et j'ai pu les installer facilement en suivant les instructions. L'étape de centrage du filet dans l'espace à combler était également bien expliquée, et j'ai pu la réaliser sans aucun problème.

La mise en tension du filet à l'aide du cordage a été une étape cruciale, mais grâce aux conseils du guide et des vidéos, j'ai pu la réaliser sans aucun souci. Les nœuds nécessaires pour fixer le filet étaient expliqués en détail, ce qui a rendu cette phase beaucoup plus simple que je ne l'aurais imaginé.

En fin de compte, je suis fier d'avoir réussi à installer mon filet de mezzanine Feelnets par mes propres moyens. Le résultat est top ! On s'y sent bien ! C'est plus confortable qu'un hamac et on n’a même pas besoin d'un oreiller. »
If you still have doubts, here are the five points you absolutely must know before you start.
Five Key Points to Ensure Successful Installation of your Net:
- Make sure you have the right support: Before starting the installation, it is essential to ensure that you have the right support. We recommend solid supports such as wood, concrete, IPNs (steel I-beams) or other appropriate materials. Depending on the desired fixing surface, you will need to choose suitable fixings. Don’t hesitate to contact us if you have questions about choosing the support or fixings.
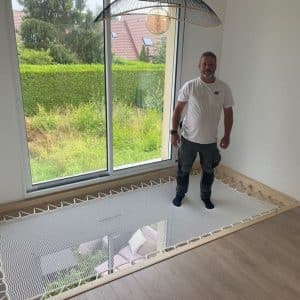
- Appropriate fixings: The first key point is to choose the right fixings for your project. Make sure to select fixings designed for the type of wall on which you will install the net. Feelnets offers fixings for wood and concrete, so choose according to your specific situation. The right choice of fixings is essential for a solid and secure installation.
- Alignment of fixings: Make sure to position the fixings regularly and aligned all around the perimeter of the net. It is recommended to space them at intervals of 150 mm to ensure an even distribution of tension on the net. Precise alignment ensures the stability and functionality of the net.
- Tensioning the net: Tensioning the net is a crucial step. Make sure to follow the guide’s instructions to correctly tension the net using the provided cordage. The tension of the net must be uniform to ensure its strength and safety. Don’t forget to follow the guidelines on which knots to use to properly secure the net.
- Checking all four sides: When installing, make sure that all four sides of the net are properly secured. It is imperative to fix each side so that the net is evenly tensioned. Leaving one side unfixed would make the net unusable and potentially dangerous. Be sure to fix all sides to ensure the safety and functionality of your net.
By following these 5 key points, you will be well prepared for a successful installation of your home net by yourself.
One last piece of advice before you start: Follow the installation guide. Use the installation guide provided with your package. This guide is a valuable resource that will guide you step by step through the installation process. Carefully follow the instructions in the guide, paying particular attention to the diagrams and details provided. This is the key to a hassle-free installation.
Find all our Advice in our Toolbox:
In which framework can we install a custom-made net for Housing?
Our fixings for residential nets
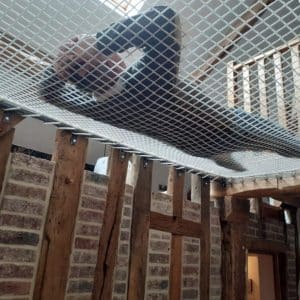
How to install a Mezzanine Net in a dwelling
Videos:
Installation of a residential net
Installation of a net with double lacing
Installation of a net in a tiny house by DIY influencer Sylvie Pereira
If you don’t feel ready to embark on the adventure yet, Feelnets provides you with its network of trusted craftsmen and net installers. Don’t hesitate to call on them for a custom installation. Our partners are at your service and can assist you with all your projects.