




What mesh size should you choose for your catamaran net?
The choice of mesh determines comfort on board, the net’s lifespan, and its performance while sailing. Constantly exposed to sea spray, salt, UV rays, and friction against the lifelines, a catamaran trampoline wears differently than a standard deck net: the stresses are more severe, and the materials required are more specialized.
Feelnets offers three materials for its custom-made catamaran nets, each designed for a specific type of sailing and level of demand. This guide will help you identify the one that best suits your boat and your intended use.
Quick Comparison of Feelnets Meshes
Marine conditions require specific materials: resistance to saltwater, resistance to intense UV rays, and minimal relaxation under constant tension. Feelnets offers three materials for catamaran nets, available in several sizes depending on your intended use, with their key features at a glance.
| Polyester 3+ , 30×30 mm |
Polyester 3+ , 13×13 mm |
PVC Mesh Serge Ferrari |
Dyneema® 22×22 mm |
|
|---|---|---|---|---|
| Strength | 220 kg/m² | 220 kg/m² | Extreme | Exceptional |
| Relaxation rate | Low | Low | Nil | Nil |
| Seawater | Very good | Very good | Excellent | Excellent |
| Colors | ||||
| Ideal Use | Transatlantic, Long-Distance |
Cruise Charter, comfort |
Large capacity Premium finish |
Competition Ultralight |
Feelnets Mesh for Catamaran Nets: A Closer Look
Each mesh is designed to meet different sailing requirements.
Feelnets’ exclusive 3+ polyester meshes cover the vast majority of uses, from charter to long-distance sailing.
Serge Ferrari PVC Mesh is designed for large volumes and premium finishes.
Dyneema is reserved for competitive multihulls or sailors seeking maximum weight savings.
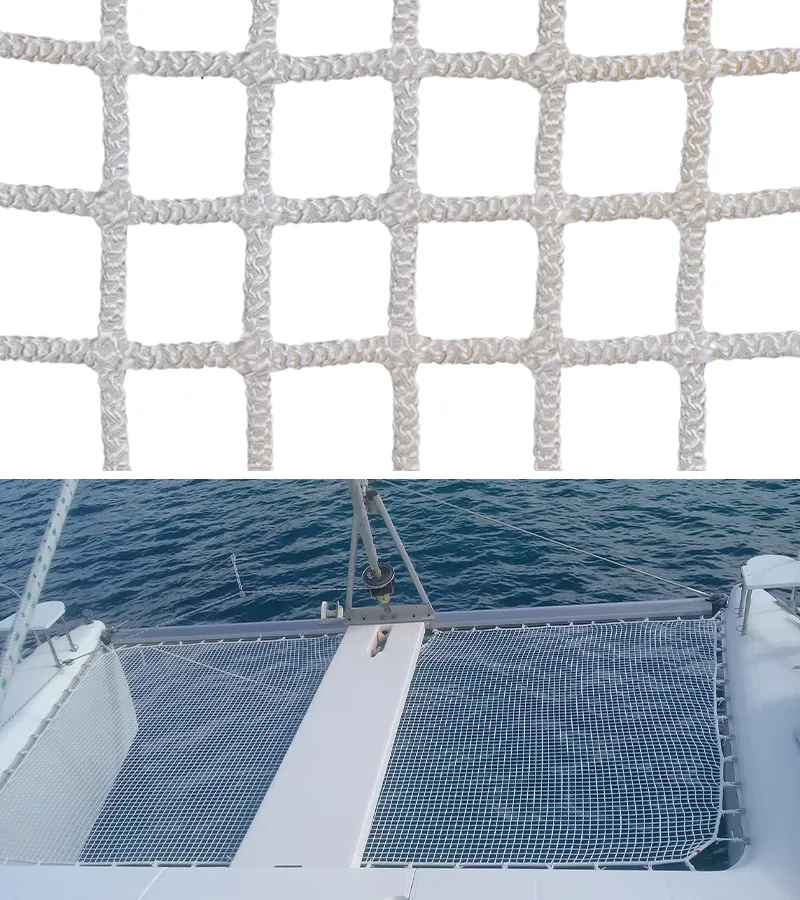
30×30 mm Mesh, Polyester 3+
The versatile knit, for cross-country travel and long-distance sailing.
Ideal uses
- Transatlantic and Trans-Pacific
- Long-distance offshore sailing
- Cruising catamarans of all makes
- Priority on lightness and transparency
Colors
Benefits
- Strength: 210 kg/m²
- Lighter than the 13×13 mm
- Let the water flow and let your gaze wander toward the sea
- 250 kly UV-resistant coating
- Available in 4 colors
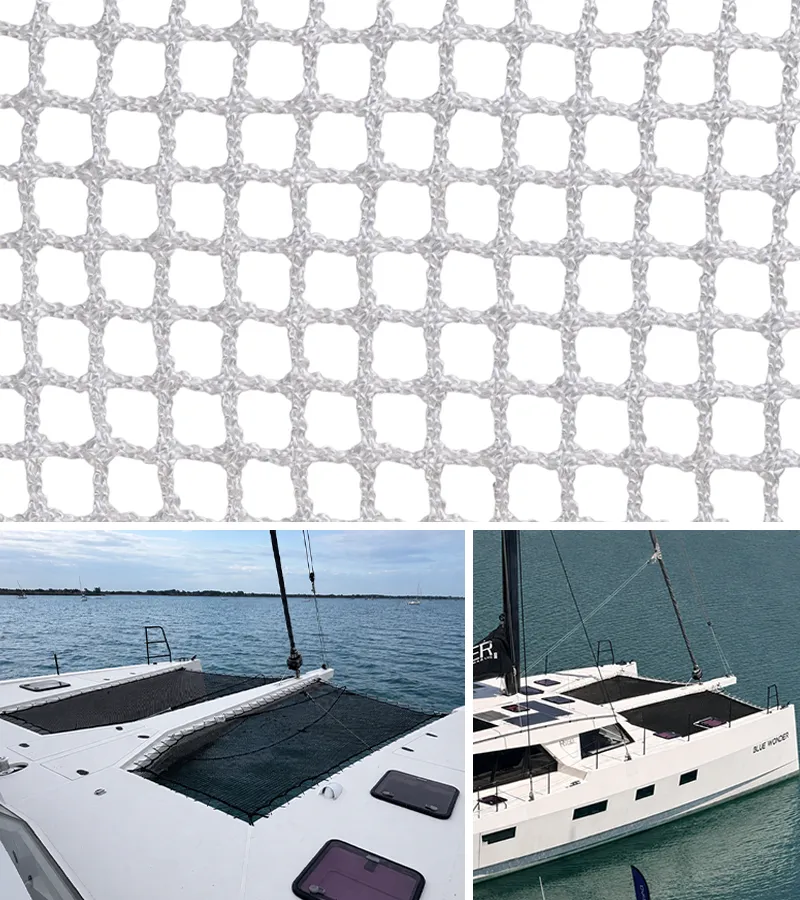
13×13 mm Mesh, Polyester 3+
Tight-knit fabric, for cruising and charter: maximum comfort and optimal retention.
Ideal uses
- Cruising and Charter Catamaran
- Coastal and Offshore Navigation
- Standard Replacement for All Brands
- Priority on comfort and retention
Colors
Benefits
- Strength: 200 kg/m²
- Tight mesh, traps small objects
- 250 kly UV-resistant coating
- Very good resistance to salt water
- Excellent barefoot comfort
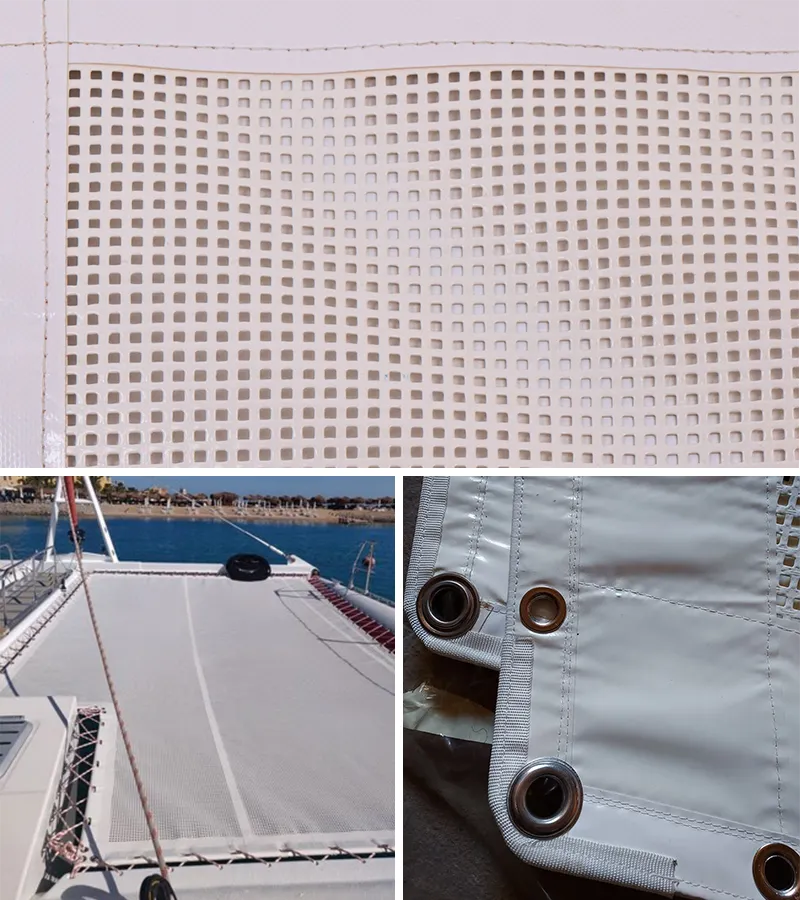
Serge Ferrari PVC Mesh
The leading technical fabric for large catamarans and high-end finishes.
Ideal uses
- Large catamarans and multihulls with ample interior space
- Premium finish, architectural look
- Highly exposed marine environment
- High-End Replacement
Colors
White, available in two thicknesses (392 and 492) depending on the intensity of use
Benefits
- Extreme resistance to UV rays and salt spray
- Zero relaxation rate
- Smooth, knot-free surface; easy to maintain
- Welded and sewn edges
- Originally designed for marine competition
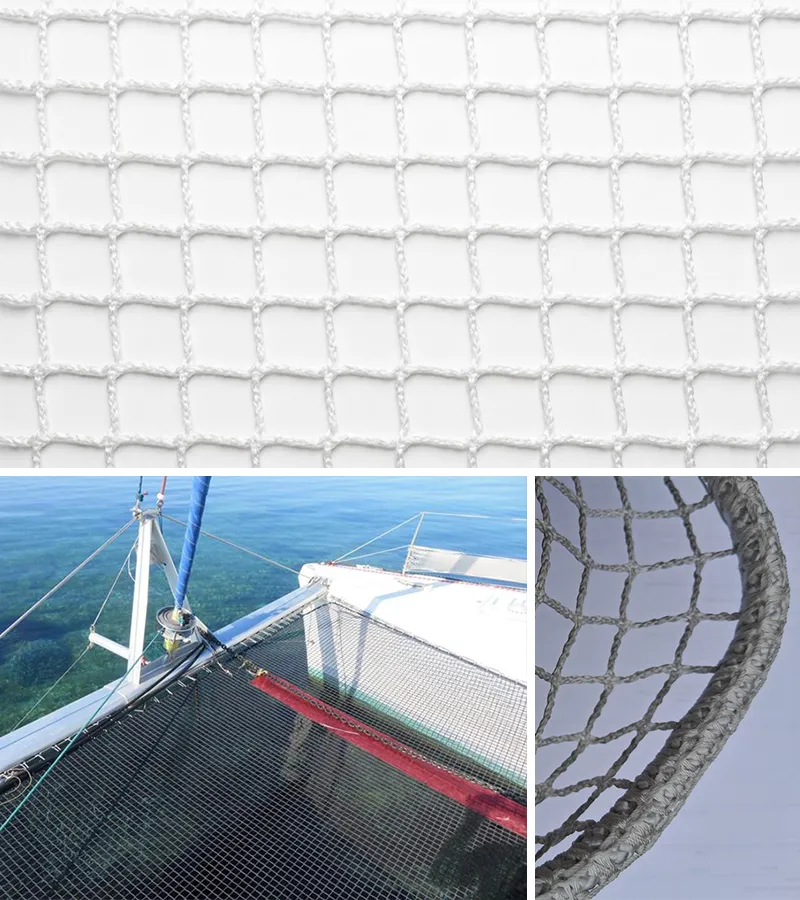
Dyneema® 22×22 mm
Ultra-lightweight mesh, for racing multihulls that won't tolerate any compromises on weight.
Ideal uses
- Competition and regatta multihull
- Offshore racing
- Any project where weight is a critical factor
- Extreme sailing, harsh conditions
Colors
Benefits
- Exceptional durability with minimal weight
- Zero relaxation rate
- Excellent resistance to saltwater and UV rays
- Knotless braided mesh
- Tension cord available upon request
What mesh size is right for your fishing style?
Every sailor has their own constraints: boat type, intended use, frequency of sailing, and whether weight or comfort is the priority. Here are the most common setups and the mesh size Feelnets recommends for each.
Cruises and Charter Boats
Recommended mesh size: 13×13 mm, 3+ polyester
Maximum comfort, optimal retention, ideal for families and rental fleets.
Long-distance travel and crossings
Recommended mesh size: 30×30 mm, 3+ polyester
Lighter, water-permeable, and see-through, available in 4 colors to customize your deck.
Competition and Regatta
Recommended mesh size: Dyneema® 22×22 mm
Exceptional strength, minimal weight, zero relaxation: the choice for racing multihulls.
Large capacity and premium finish
Recommended mesh: PVC Mesh by Serge Ferrari
Smooth surface, extreme resistance to salt spray and UV rays, easy maintenance: the gold standard.
Tensioning Cord and Finishes
The tension cord is not included with your order, but Feelnets also manufactures it and can advise you on the best choice for your material and mounting system. For 3+ Polyester nets, the edge is overlocked, and the recommended cord is 10 mm around the entire perimeter. Serge Ferrari PVC Mesh nets feature a welded and sewn edge, with the option of grommets or sleeves for rods depending on your configuration. Dyneema is supplied with competition-grade cordage, in 4, 6, or 8 mm depending on the deck dimensions. The number of meters required is calculated based on your boat model or dimensions and specified in your personalized quote.
Do you know what mesh you need? Get your personalized quote in less than 3 hours.
Would you rather talk it over before you get started? Our team is available by phone, email, or WhatsApp.
FAQ - Frequently Asked Questions About Choosing Catamaran Net Mesh Size
What mesh size should you choose for a cruising catamaran?
The 13×13 mm Polyester 3+ mesh is the most common choice for cruising and chartering: maximum comfort, optimal retention, and proven durability. For long-distance sailing where light weight is a priority, the 30×30 mm mesh is preferable.
What is the difference between a 13×13 mm mesh and a 30×30 mm mesh?
Both are made of Polyester 3+, with equivalent strength and the same UV protection. The 13×13 mm mesh is tighter: it traps small objects, reduces the sensation of vertigo, and offers superior comfort when walking barefoot. The 30×30 mm version is lighter, allows water to pass through and offers a view of the sea, and is available in 4 colors, compared to 2 for the 13×13 mm version.
Is Dyneema suitable for a cruising catamaran?
Dyneema 22×22 mm is a premium material originally reserved for competition and racing multihulls. It costs significantly more than polyester. For a cruising catamaran, 3+ polyester offers the best balance of quality, durability, and price. That said, more and more recreational sailors are choosing Dyneema—even if they don’t race—simply to take advantage of its exceptional lightness and durability: it’s a worthwhile investment if these factors are a priority for you.
What is the lifespan of a Feelnets catamaran net?
Under normal use, a 3+ polyester net has an estimated lifespan of 3 to 7 years, depending on UV exposure, frequency of use, and sailing conditions. Serge Ferrari PVC Mesh and Dyneema offer superior durability. Rinsing the net with fresh water after each outing significantly extends its lifespan.
Is my catamaran model listed on Feelnets?
The most popular models are listed directly in the quote form: Lagoon, Fountaine Pajot, Outremer, Nautitech, HH Catamarans, and many others. If your model isn’t listed, simply provide the make and model; our team has the plans and will contact you to confirm the dimensions.
Does the net come with the tension cord?
The tension rope is not included by default, but Feelnets also manufactures it to order and can advise you on the appropriate diameter and length for your boat model and mounting system. Just mention this when requesting a quote.
How do I get a quote for my catamaran net?
Fill out the form on the catamaran net page by selecting your boat model, the desired material, and any specific requirements you may have. Our team will review your project and send you a personalized quote within 3 hours.


Buying guide trampoline nets for Lagoon catamarans

Lagoon 380, Lagoon 400, Lagoon 410, Lagoon 420, Lagoon 440, Lagoon 450, Lagoon 470, Lagoon 47, Lagoon 500… Feelnets manufactures trampoline for the whole range of the brand, from the oldest to the newest.
Across the world many Lagoon catamarans are already equipped with Feelnets nets. Not only are we trusted by boat owners but also by our partners, such as Dream Yacht Charter, the global leader for boat rental.
Dream Yacht Charter owns a significant number of Lagoon catamarans to be found in many of their rental centres.

Feelnets manufactures trampoline nets (lien)for the whole Lagoon catamarans range, in polyester or in Sergio Ferrari’s 492 prestressed PVC mesh (lien).
Our mesh is available in 13 x13 mm (0,51 x 0,51 inch) or 30x30 mm (1,18x1,18 inches), black or white.
The rope is 10 mm (0,39) thick, overlocked, for any size of mesh.
Lagoon trampolinesnets made of Sergio Ferrari’s 492 prestressed PVC mesh, come with welded and stitched edges. Eyebolts are set every 150 mm (5,9 inches) all the way round. The biggest nets come with a circlip sleeve.
Before we start manufacturing your new Sergio Ferrari’s PVC mesh trampoline, Feelnets will send you the layout for confirmation, to make sure it matches the dimensions of your trampoline.
Feelnets uses the same 30 x 30 mm (1,18 x 1,18 inches) white polyester mesh that was originally set up on Lagoon catamarans.
If you will be using your Lagoon on the sea, Feelnets advises that you use 30x30 mm mesh. If the sea conditions are strong, your trampoline net will allow the waves through and it will not alter the handling of your catamaran.
Most of the boat rental companies equip their Lagoon with 13 x 13 mm net to enhance its cosiness while mooring.
Feelnets is known and renowned among our partners for the quality of our Lagoon trampoline nets. They are the perfect upgrade when your existing Lagoon net needs to be replaced.
We can provide for any model of the Lagoon brand. Many nets are in-store, however, if your model is not it will take us 10 to 15 days to manufacture.
Feelnets delivers Lagoon nets all over the world. Our expert team will deliver your quotation within 3 hours. If your boat is in transit, we can rely on our network of partners to deliver your parcel wherever you are.
Feelnets is here for you, it’s as simple as that

Buying guide trampoline net for catamaran Fountaine Pajot
Fountaine Pajot catamarans net by Feelnets.

Fountaine Pajot, world famous catamaran maker of boats from 32 to 82 feet.
Feelnets, is partner to the biggest boat rental companies in the world, such as Dream Yacht Charter. These companies rent Fountaine Pajot catamarans on a daily basis.

Our replacement nets for Fountaine Pajot catamarans are a perfect match. They have been tested and approved by owners and Feelnets’ partners all over the world.
Feelnets manufactures Fountaine Pajot catamaran nets for Maldive32, Lavezzi40, Bélize43, Bahia46, Salina48, Ipanema, Tahiti75, and the whole range of the Fountaine Pajot brand.
Quality Fountaine Pajot nets in braided mesh polyester are available in black and white.
Feelnets also sells the lacing rope that will join your trampoline with your hull fixings. Polyester rope from 4 to 6 mm (0,15 to 0,23 inches), black or white. The necessary length will appear on your quote.
Depending on your sailing programme, Feelnets offers 13 x13 mm (0,51 x 0,51 inch) or 30x30 mm (1,18x1,18 inches) mesh.
If you will be using your Fountaine Pajot on the sea, Feelnets advises that you use 30x30 mm mesh, that will let the waves through your trampoline net and will not alter the handling of your catamaran.
To enhance the cosiness, Feelnets advise 13x13 mm mesh. You will enjoy its softness on your cruising and mooring days. We also advise Sergio Ferrari’s 492 prestressed PVC mesh with welded and stitched edges.
The edges come with eyebolts set every 150 mm (5,9 inches), all the way round. For the biggest nets, they come with a circlip sleeve.
Before we start manufacturing your new PVC mesh trampoline, Feelnets will send you the layout to make sure it matches the dimensions of your Fountaine Pajot.
Feelnets, expert in multihulls nets, can send Fountaine Pajot nets all over the world.
Feelnets holds a large amount of trampoline nets for Fountaine Pajot catamarans.
If your net is not in-store, it takes 10 to 15 days to manufacture.
Feelnets, globally known for the quality of its Fountaine Pajot nets, will reply and send your quote within 3 hours. A team of professionals is at your service to meet your needs. We deliver all around the world.
If your boat is in transit, we can rely on our network of partners to deliver your parcel wherever you are.
Feelnets is here for you, it’s as simple as that!

In which framework can we install a custom-made net for Housing?
The indoor net must be installed in a solid frame. The custom net cannot be fixed to plasterboard or other non-resistant walls.
Here are the different possible scenarios; you will surely find your configuration in the examples below.
Installing the Net in a Wooden Frame

You need to verify that your beams are at least 80mm thick.
In this case, place the fixings all around the perimeter every 150mm.
Fixings proposed by Feelnets, the 8*80mm eye bolts or the cleats on a plate with 50mm screws.
Be sure to take the edge-to-edge dimensions of the void. If you don't have a perfect rectangle, you'll need to provide us with the interior diagonals for the net construction.
Installing the Mezzanine Net in Concrete Walls.
You can install a net in concrete walls, you can use the fixings proposed by Feelnets such as the 8*80mm eye bolts with suitable concrete anchors.
You will need to drill into the concrete every 150mm to fix the anchors and then screw in the eye bolt.
Installing a Custom Net in I-beams
Installing the catamaran net in a frame with I-beams, you have several options.
- Either you drill clean, well-rounded holes in the I-beam every 150mm so that the tension rope cannot rub and get damaged.
- Or you can weld a metal bar and pass the tension rope around the bar. (This option allows you not to place fixings every 150mm)
- Or you can drill and screw lifting rings with a nut every 150mm.
Installing a Residential Net with a Stove or Chimney Flue Passage
Feelnets manufactures custom nets.
If you need a cutout in the net to pass the flue, simply indicate on your plan the dimensions of the cutout to be made on the net.
To create the cutout around the flue passage, you need to make a frame so that the net can be fixed to this frame.
Indeed, the net must be fixed around the entire perimeter to obtain a good distribution of load and tension.
If you leave an unfixed space in the net, the tension will not be good and the net will not be comfortable.
Installing a Net in Hollow Brick.
It is entirely possible to fix the net in hollow brick, for this you just need to fix the eye bolts with chemical anchoring.
Feelnets does not offer chemical anchoring, but you can find it in all specialized stores.
Installation on Walls with Drywall and Insulation.
Do you have beams or a load-bearing wall behind the drywall?
In this case, you need to make sure that behind the drywall you don't have insulation or fiberglass or anything else.
Be sure you can reach a hard surface behind.
Either the surface is just behind the drywall, in which case you can stay with the 8*80mm eye bolts.
Or you have insulation in addition to the drywall to go through to reach the hard surface, in which case it's preferable to add a beam that will be fixed with lag screws and it's on this new beam (minimum 80mm thick) that you will fix the fixings for the net.
Or you use larger eye bolts like the 12x120mm or even larger if necessary.
Installation between 3 Walls with a Stairway Passage
You have 3 walls and on one side, a staircase that gives access to the mezzanine.
For the installation, you will need to add a beam or a metal bar to complete the frame.
This addition will be made at the staircase level. It is imperative that the net be fixed on all sides to obtain a good distribution of tension over the entire surface.
Installation of Interior Net between Two Windows
Check that you have a beam or load-bearing wall between the two windows.
Indeed, it will be on this wall that you can place fixings every 150mm.
We recommend nets with 30x30mm mesh to maintain light passage.
If you don't have a wall on which to attach the fixings, we advise you to stretch a metal bar between the two parallel walls.
You can pass the tension cord to tension the net around it, and you will therefore not need any fixing on this part.
Net installation on a 3-sided opening
In this case, you need to add a wooden beam to close the opening or fix a metal bar or an I-beam that will close the opening.
Once your frame is done, you just need to apply the fixings on each wall. (Count one fixing every 150mm except on the metal bar.)
Feelnets, the specialist in custom-made nets for homes.
Production takes between 10 and 15 days.
Free delivery in France excluding Corsica.

How to Install a Mezzanine Net in a Home
Installing a mezzanine net is no big deal. At Feelnets, 96% of customers install their nets themselves—in pairs—using just a screwdriver and a bit of careful planning. This guide walks you through the process step by step: check your mounting points, install the fasteners, center the net, and tighten it.
Installation and material selection are two separate issues. Here, we’re talking about the process: how to install your net once it’s been manufactured and delivered. To find out which fastener is right for your substrate—whether it’s wood framing, concrete, or a metal structure—please refer to our fastener guide, which provides detailed information on each product. And if you’d rather have the installation done for you, Feelnets works with a network ofpartner contractors throughout France.
Should you set the net yourself or have a professional do it?
Installing a mezzanine net is something anyone with a little DIY experience can do. It’s easier with two people, but it doesn’t require any special strength or specialized tools: a screwdriver is all you need, and our screwdriver bit saves valuable time when there are a lot of fasteners to install. At Feelnets, 96% of customers install their nets themselves.
In practice, installation involves three steps: spacing the fasteners every 150 mm around the entire perimeter, centering the net in the space to be filled, and then lacing it and tightening it with the rope. Each order comes with fasteners suited to your surface, the rope, and detailed installation instructions. We’ll go over these steps in more detail below.
Testimonial from Guillaume T., a Feelnets customer:
At first, I wondered if I would be able to install the mezzanine net in my home on my own. However, thanks to the Feelnets installation guide that came with my package and the very informative videos available on the Feelnets website, everything went very smoothly.
With a systematic approach and Feelnets’ clear and detailed installation guide, it seemed very simple to me. Each step is accompanied by diagrams and easy-to-follow instructions.
The videos on the Feelnets website were also very helpful to me. They let me see each step in action, which is quite reassuring.
I was pleasantly surprised to find that I didn’t need any special tools or specific skills. The fasteners were included in my package, and I was able to install them easily by following the instructions. The step for centering the netting in the space to be filled was also well explained, and I was able to do it without any problems.
Tightening the net with the rope was a crucial step, but thanks to the guide’s advice and the videos, I was able to do it without any trouble. The knots needed to secure the net were explained in detail, which made this part much easier than I would have imagined.
All in all, I’m proud that I managed to set up my Feelnets mezzanine net all by myself. The result is great! It feels so good! It’s more comfortable than a hammock, and you don’t even need a pillow.
If you’d rather have someone else do it, a carpenter, joiner, or roofer can easily install a Feelnets net. Don’t have a contractor on hand? We’ll connect you with a partner installer near you. Request a quote, and we’ll get back to you in less than 3 hours.
Before installing, here's what you need to check
Installing a net is simple, as long as you check one thing before anything else: the strength and distribution of your support structures. This is what ensures the safety of the installation and its durability over time. There are two things to check—ideally before you even order your net.
A sturdy anchor point on all four sides.
A horizontal net must be secured on all four sides. The tension is distributed evenly around the entire perimeter: if even one support is missing on any side, the net won’t stay taut, it becomes unusable, and you won’t be able to walk on it. So make sure that every side of your space has a solid anchor point: a beam, load-bearing wall, roof truss, or floor slab.
If one side faces a void, a glass roof, or a non-load-bearing partition, all is not lost. A taut stainless steel cable can serve as the missing support, with the net secured directly to it. This cable-mounted installation is described in detail in the fastening guide.
What types of substrates are suitable, and why should you never use drywall?
Suitable substrates include hard materials: wood framing such as roof trusses or beams, concrete, and metal or IPN structures. Each requires a specific fastener, which you can select using the fastener guide.
One warning, however—and this is absolutely crucial: never mount a horizontal net on drywall. The mounting won’t hold, and the installation will be dangerous, because drywall is incapable of supporting the weight of a net that people walk or lie on. If your walls are made of drywall, you’ll need to locate the load-bearing structure behind it, or install the net using cables anchored to solid points.
Step-by-Step Installation Instructions
Once your backing materials have been approved, the installation takes place in four steps. It doesn’t require any special skills, just a systematic approach and a little patience to ensure evenness. It’s best to have two people, especially when stretching the material.
Mark the mounting points every 150 mm all around the perimeter, making sure they are properly aligned. This even spacing distributes the tension and results in a flat, wave-free net. No need to count: Feelnets calculates and delivers the exact number of fasteners for your project.
Screw the fasteners into each marked point, either directly into the wood or into the concrete using the provided anchors. Our screwdriver bit, compatible with any power drill, saves valuable time when working on large surfaces. The choice between a piton and a bracket is explained in the fastener guide.
Unroll the net and position it so that it is centered in the space to be filled, before applying any tension. Now is the time to check its orientation and alignment, while it is still loose.
Attach the net to its fasteners by threading the cord all the way around, then gradually and evenly tighten it, side by side, to ensure even tension. The type of lacing—single, double, or stitch-by-stitch—is detailed in the fastener guide and in the instructions included with your order.
Each net comes with installation instructions that outline these steps in detail, complete with lacing diagrams. And if you have any questions during installation, our team is available by phone, email, or WhatsApp to help you through it.
How long does it take to install a mezzanine floor?
There is no set time frame, as installation time depends mainly on the number of fasteners to be installed—and therefore on the size of your net. The 150 mm rule for the entire perimeter makes it easy to estimate: divide the perimeter of your space by 15 cm. A 2-meter-by-2-meter net, for example, has a perimeter of about eight meters, which means you’ll need about 50 fasteners.
The type of surface also matters. On a wood frame, the fasteners are screwed in directly—that’s the quickest method. On concrete or an IPN beam, pre-drilling and installing anchors or bolts adds time. Working in pairs and using a screwdriver bit makes a big difference on large surfaces, where the number of fasteners to install quickly becomes significant.
It’s also important to know that lacing and tightening often take up a good half of the time.
After installation, retensioning, and maintenance.
Once installed, a Feelnets net requires virtually no maintenance, but there are two simple steps you can take to help it last longer and maintain its appearance over time.
The first issue concerns tension. A new net loosens slightly during the first few months of use, as the fibers and lacing settle in. This is normal, and it’s easy to fix: simply tighten the netting a little. If your setup includes shackles between the net and the cordage, you can retighten the net in just a few minutes without touching the lacing. This is explained in detail in the mounting guide.
The second is routine maintenance, which is quite simple. The polyester mesh is UV-treated and is resistant to both moisture and light. Simply dusting it off from time to time and rinsing it with clean water once or twice a year—for a net that’s exposed or used outdoors—is enough to keep it looking its best. No special products are needed.
Ready to install your mezzanine net? Get your personalized quote in less than 3 hours. Your net comes ready to install, with the proper fasteners for your mounting surface and detailed installation instructions.
Do you have questions about installation or your mounting surface? Our team is available by phone, email, or WhatsApp.
FAQ - Frequently Asked Questions About Installing a Mezzanine Net
Can you install a mezzanine net on your own?
Yes. It’s easier with two people, especially when tightening the net, but it’s still possible to install it on your own. It doesn’t require any strength or specialized tools—a screwdriver is all you need. At Feelnets, 96% of customers install their nets themselves.
Can a mezzanine net be secured to drywall?
No, never for a horizontal net. Drywall cannot support the weight of a net that people walk or lie on: the fasteners would give way, and the installation would be dangerous. It must be anchored to a load-bearing substrate—such as wood, concrete, or metal—or installed using a cable secured to solid anchor points.
Do you need to secure all four sides of the net?
Yes, on a rectangular frame. The tension is distributed evenly around the entire perimeter: if a support is missing on even one side, the net will not be taut and will become unusable. If one side faces a void, a taut stainless-steel cable can replace the missing support.
How long does it take to install a mezzanine floor?
It depends mainly on the number of fasteners—and thus the size of the mesh—and the type of substrate. On wood framing, the fasteners are screwed in directly, which is the quickest method; on concrete or IPN, pre-drilling adds time. Working in pairs and using a screwdriver bit significantly speeds up installation on large surfaces.
Who can set up my net if I don’t do it myself?
A carpenter, joiner, or roofer can easily install a Feelnets net. If you don’t have a contractor, Feelnets will connect you with a partner installer near you.

How to Choose the Right Living Net
Feelnets, creator of custom nets, presents a guide to help you choose your indoor net, your guardrail, or your outdoor net. Passionate about multihulls and expert in catamaran nets, we have put our know-how at the service of housing, protection with guardrails, and hotels worldwide. Do you want to install a custom net?
Here is a list of questions our customers ask with answers from our specialists so that your project can take shape.

Why a Living Net
What Advantages Does an Indoor Net Offer?
The custom living net, or indoor net will offer you a zen space. An original space, without barriers, suspended above your kitchen, living room, entrance...
There are many spaces where you can install a suspended net to gain an additional room.
Easy to install, it transforms your empty spaces and adds volume, and especially comfort: who hasn't dreamed of having a giant hammock at home?

Pleasant and comfortable, the net will offer you many moments of relaxation and unwinding.
Furnished with a few cushions and a good blanket, it's the perfect place to read or watch a movie.
The soft and flexible material allows light to pass through into your interior.
And then the price! Indeed, you will be surprised by the price and quality of Feelnets products.
Which Mesh to Choose? Braided or Knotted?
The braided mesh is what we offer for living nets, for hotels, chalets, and other horizontal uses.


Indeed, the meshes are connected by braids which makes the material very pleasant to touch for lying down, relaxing, or even walking.
We recommend the knotted mesh for vertical nets. Indeed, the small knots give relief to the guardrail or protection net for swimming pools or terraces.

Is the 30x30mm Polyester Mesh Too Wide for Babies' Feet?
No, it's the ideal size for them and for you parents, suitable for not having to pick up pacifiers and other objects that children might pass through the meshes.

Net Resistance
Can one Jump on a Living Net?
The living net is a suspended net that is fixed with a polyester tension cord placed in lacing between the fixings and the edge of the net (also called boltrope).
This cord is not elastic, so it does not offer a bouncing sensation.
You should not jump on the net, it is in place to provide a space for rest and relaxation in your interior.
Can Several People get on the Net at once?
Yes! You can have several people on the net. This original and atypical space is very resistant, more than 240kg/m².
The indoor mezzanine net is very convivial, it will delight the whole family.
Does the net sag a lot when you're on it?
Feelnets makes custom nets based on your dimensions.
Our nets are made slightly smaller than your dimensions so that you can put it in a flat and very taut position - taut like a string, pardon the expression ;)
Under tension with people on the net, it will sag but very little.
Custom Net Materials
Which Material to Choose for My Living Net?
Feelnets recommends polyester material.
It is with this same material that we now equip the largest boat rental companies and hotels worldwide.
This material, naturally tested by our partners, allows us to guarantee a product of excellent quality.
Unlike other materials, polyester remains pleasant and comfortable over time, it does not become rough.
However, Feelnets also offers polyamide or polypropylene nets on request.
Would You Prefer a 30x30mm or 13x13mm Mesh?
The larger the mesh, the more light passes through; the smaller the mesh, the more comfortable the net.
If you need light to pass through, Feelnets definitely recommends the 30x30mm mesh, which offers both comfort and light transmission.
On the other hand, if you don't have any light or skylights, opt for even more comfort with the 13x13mm mesh.
Both are made of polyester and can be used indoors and outdoors.
The mesh resistance is 200kg per m².

What about Wider Meshes for more Light?
Why choose 30x30mm meshes rather than wider meshes that should let more light through?
Meshes larger than 30x30mm will be thicker to provide comfort. This thickness is more visible from the room below the net and will form a visible false ceiling.

Furthermore, for young children, the mesh won't be very pleasant for them and their little feet, they won't enjoy climbing on the net.
And for you parents, a 30x30mm mesh will prevent you from having to pick up all the objects your child might push through larger meshes.
Do You Have Colored Nets?
Feelnets offers polyester nets with 30x30mm or 13x13mm mesh of quality in white or black.
The tension rope is also available in black or white.
We also offer colored nets on request.

Available Colors
We offer nets in blue, green, red, yellow, gray, sand, however, they are not made of Polyester.
It is preferable to use this type of net for a vertical position, as a safety guardrail.
Colored nets can be used both indoors and outdoors.
Vocabulary
What is the Net's Boltrope?
The net's boltrope is the term used to describe the edge of the net. It consists of a 10mm safety rope. It's around the net's boltrope that you will pass the tension rope in lacing for tensioning.
What is the Tension Rope?
The tension rope is a polyester rope with a diameter of 10mm. Made of multiple strands, it offers no elasticity to obtain a strong tension on your residential net.
The resistance is over 3 tons. Otherwise used as a halyard to hoist boat sails.

About Feelnets: Net Specialist in France
Today, Feelnets is a partner of Maserati and Dream Yacht Charter (world's number 1 in sailboat rental).
Feelnets now exports its custom-made nets all over the world, whether to equip private homes, hotels, or multihulls.
Contact our team and receive a quote for your custom net project.